How To Make a Puzzle Board
During the trying times of Covid-19, if you can’t go to Hawaii, let Hawaii come to you via the magic of puzzles! There are so many pretty Hawaii scenes to choose from, that you might want to go professional and get a puzzle board. While you can buy one online, the following DIY project might save you money and help have quality family time.
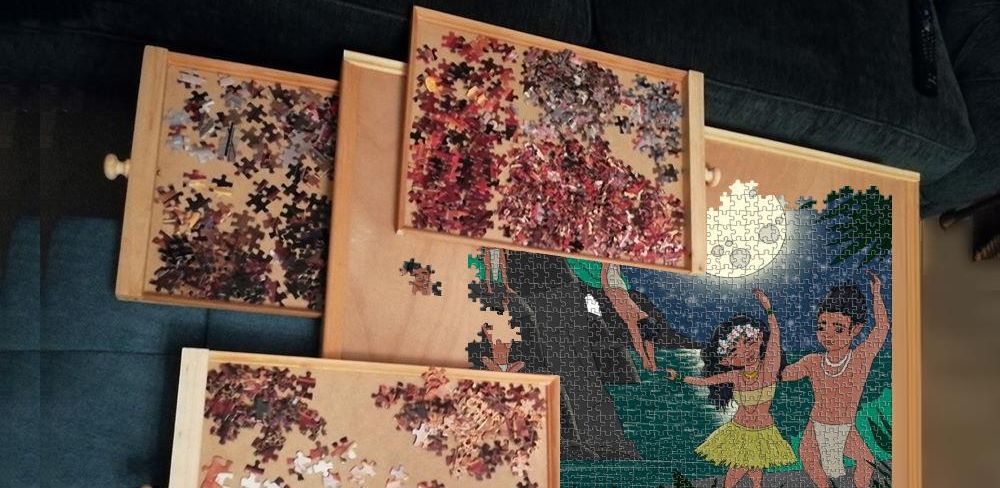
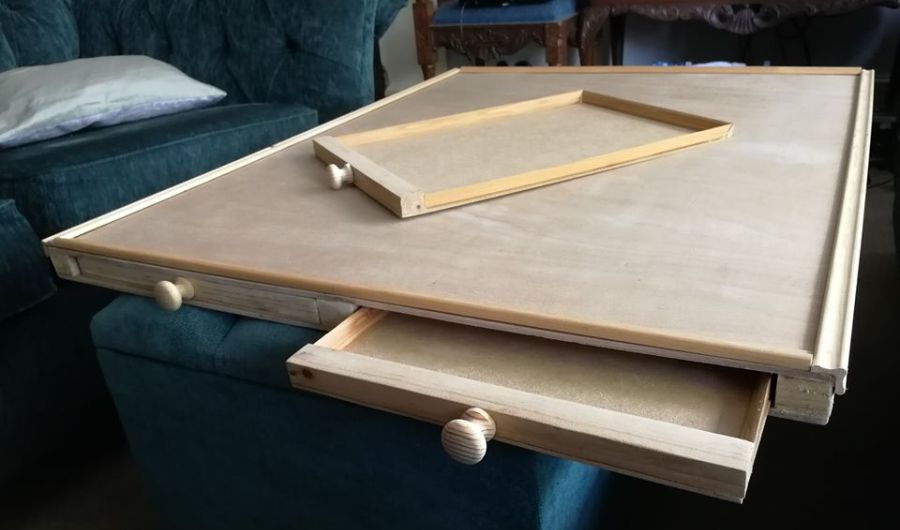
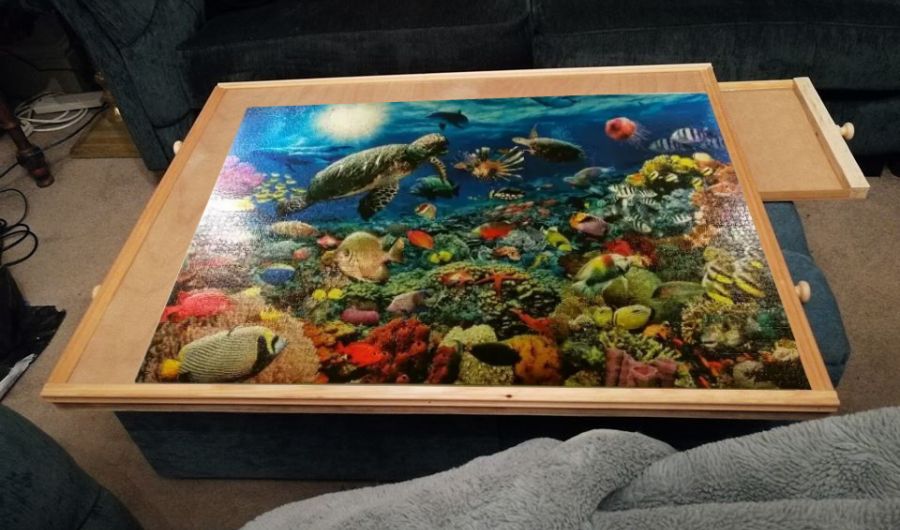
Most puzzle boards give you a large flat surface to work on that you can move around as needed. My DIY puzzle board project will also allow you to conveniently sort colors, which speeds up puzzle construction a lot. Four drawers can be neatly stored under the puzzle at the end of the day.
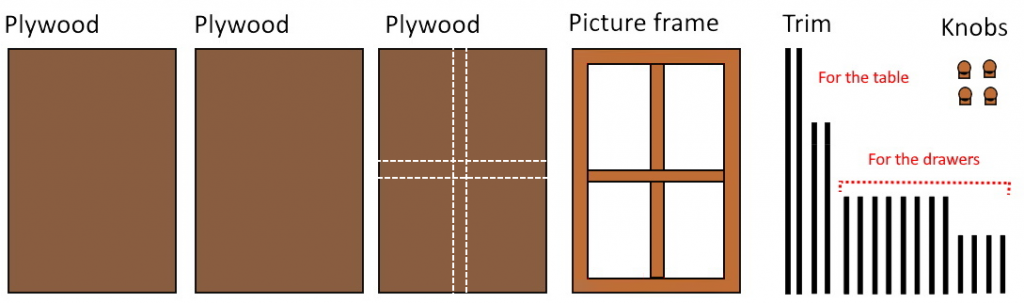
To make this puzzle board, you will need:
- 3 pieces of plywood
- A picture frame of the same size as each of three pieces of plywood. You can recycle a canvas frame or a 4-picture frame for this. Or you can also use 5 planks of wood instead – see Step 2 for details.
- 4 drawer knobs and 4 screws
- A lot of trim – these will become drawer sides (essential) and table edges (optional)
- wood glue and finishing nail
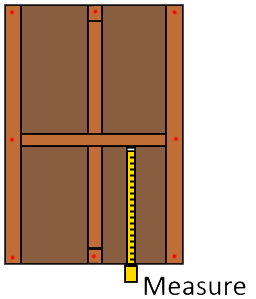
Step 1 – measure and cut 3 plywood sheets
Cut a plywood sheet into 3 identical pieces, the size of which depends on the puzzles you want to do. For example:
500 pieces: 9 x 12 inch
750 pieces: 18 x 24 inch
1,000 pieces: 20 x 30 inch
1,500 pieces: 23 x 33 inch
These are not hard rules, and making a puzzle board a few inches bigger than the puzzle you have in mind wouldn’t hurt. As for me, I used plywood sheets the exact size of the picture frame I had at hand: 28 x 35 inch and it worked well for a 1000 piece puzzle.
The first 2 plywood pieces will become the top and bottom of the table and the third piece, with modifications in Step 5, will become the drawers bottoms.
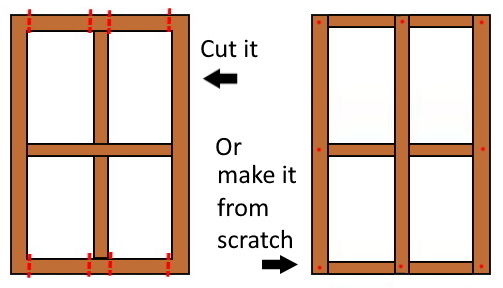
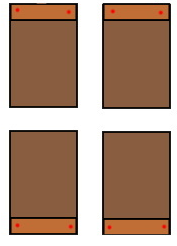
Step Two – prepare the picture frame
Cut your 4-picture frame. You will need to make 8 cuts (see illustration), and the loose pieces will become your drawer fronts in a minute, so don’t lose them! Alternatively, measure and cut nine wooden planks (3 as long as the table and 6 as wide as you want the drawers to be), to come up with the same 4-picture frame without the 4 marked pieces.
Step Three – make the center layer of the puzzle board
Glue and nail the picture frame to the first sheet of plywood. Measure how deep your drawers can be before they hit the central stick (I went for 17 inches).
Step 4 – finish the puzzle board
Nail and glue the second sheet of plywood.

Step 5 – cut the drawer bottoms
Cut the third plywood sheet into 4 pieces. The width of each pieces is the same size as the drawer fronts. The length has been determined in Step 3. Before nailing and gluing the drawer front on each plywood piece, remember to trim (or sand) them a bit: enough in fact to compensate for the thickness of the plywood used for the bottoms (otherwise they won’t fit!)
Step 6 – finish the drawers
Screw drawer handles. Then glue trim to drawers sides (essential) and table edges (optional, especially if you like to slide chunks of puzzle to and fro). This step takes a few hours to dry, so be careful!

Voilà, the puzzle board is ready! Enjoy and see you in Hawaii when the travel is open!

Caroline Levesque-Bartlett is a renaissance woman. She has studied arts for two years and laws for three. She’s now working as a French teacher (her mother tongue) and has self published a book on the subject. In her spare time, she likes to decorate her new home and spend time in her garden.


20 thoughts on “How To Make a Puzzle Board”
This is the best DIY puzzles board I’ve seen. Really like the drawers.
Thank you.
thanks Eva!
I really want to make this but I’m having trouble understanding making the drawers. If you make it using the planks, what dimensions (how wide, how thick) do you use? Sorry, I’m a blond, I need specifics.
Love the website
Thanks so much
Jan
Hi Jan, I’ll give you the exact measures of mine, which is not to say that they are the best, but they work. I apologise because everything will be stated in centimeters. When I try to convert it in inches, it gives me horrible numbers such as 27.5591 X 35.4331 inches.
My table is 70cm X 90cm
The sticks in the frame are 3cm wide (but only 2.5 cm high)
Each drawer is 30cm wide X 42 cm long (they could have been as long as 45 cm) X 2.3 cm high at the front (because I used one of the sticks to make the front and sanded it down a bit). The trim I used on the other 3 sides is not quite as high as the front (see photo above) but it really doesn’t matter.
So, just to recap, I used 3 plywood sheets of 70cm X 90cm. When the plywood was fixed to the frame, I saw that my drawer holes were 30.5 cm wide X 45 cm deep X 2.5 cm high so decided to cut the third plywood sheet (the one that becomes the drawer bottoms) in to 4 squares 30cm X 42cm each (I could have gone for longer drawers – 45 cm in fact- but I liked the fact that the drawer knobs can disappear inside when the table is not in use). I picked a trim that was lower than the 2.5cm hole I had (otherwise it would stick). I had some that was 1.5cm high but I could have gone for as much as 2 cm high. Anything as long as the total height (trim + plywood bottom) is less than 2.5 cm.
I hope this helps.
Thank you for taking the time to respond. I’m going to give it a try.
My pleasure! Let me know if you have other questions.
How heavy is this once all together? How thick plywood did you use?
I used two types of plywood, just using what had been in my garage for a while. The 2 sheets for the board itself were 1/4 inch thick, while the drawer bottoms are 1/8 inch thick (it’s the backing of Ikea furniture that I salvaged). The combined weight is 15 and a half pounds. It’s heavy-ish. Using thinner plywood everywhere might have been a good idea but as it is, it’s very sturdy, I can put my weight on it when I lean to put a piece without fear.
PS the thicker the plywood, the more your will need to sand/trim the drawer fronts to compensate – otherwise they won’t fit in.
So my wife is a puzzle nerd… she has been asking for a board for a while. I used your design to make one for her and it turned out great! Still need to put knobs on it but super easy and think family are gonna want one too… how do I post a photo so you can see? Either way great Project!
Hi Sean,
Glad you found this article helpful! You can email your photo(s) to webmaster@homeyhawaii.com. If you want, we’ll be happy to post them them at the end of the article.
Homey Hawaii team
Can i put a lazy susan on the bottom to be able to spin the table?
I suppose you could! It would require a lot of space to turn, but why not.
Hello:
I want to use an easel or some support to incline my puzzle board – I was thinking of using a plywood but on the rough side so the pieces don’t slide down- doable?
Yes. You could raise one end by sliding a 2 X 4 under one end of the table.
Thank you so much for this tutorial! I needed to make an XL size to fit a 2000 piece puzzle. When using a nail and glue method, do you glue everything first and then add the nails for extra strength and support? Thank you.
I put wood glue and nails at the same time. In the short term, nails will prevent pieces of wood from sliding or curving when the glue is still fresh. And in the long run, the glue will prevent loosening of the nails
Do you think this is a good project for a kid with supervision to take on.
no, sorry.
How long would your trim be if you did a puzzle board that is 20×30 inches can you be specific for the trim for the drawers please
I’m sorry, I don’t know exactly. A little under 260 inches is my guess, that is if you use the same trim everywhere. I used a flatter trim for the table top, so for your measurement, that’s 100 inches. Then a thicker trim for the drawers, about 160 inches. Give or take some.